MS Teams
Learn about how to use MS Teams provider for chat notifications
The Novu Microsoft Teams integration enables you to send notifications to Teams channels and direct messages (DMs) across multiple customer workspaces using a single multi-tenant bot.
You create and host a Microsoft Teams App (Bot) in your Azure environment, while your customers simply authorize (via Admin Consent) and install your bot into their specific Teams tenants.
Once a customer connects their workspace, Novu establishes a secure channel connection using your bot's credentials. You then map specific destinations, whether they are public channels or individual users to channel endpoints, allowing Novu to route notifications dynamically to the correct tenant and conversation context.
Azure and Teams configuration
Before you can configure Novu, you must create the infrastructure that hosts your bot. This involves two distinct portals:
- Azure portal: To create the identity (App Registration) and infrastructure (Bot Service).
- Teams developer Portal: To create the "App Package" that your customers will install.
Create the app identity (Azure AD)
First, we need to create a multi-tenant identity for your bot.
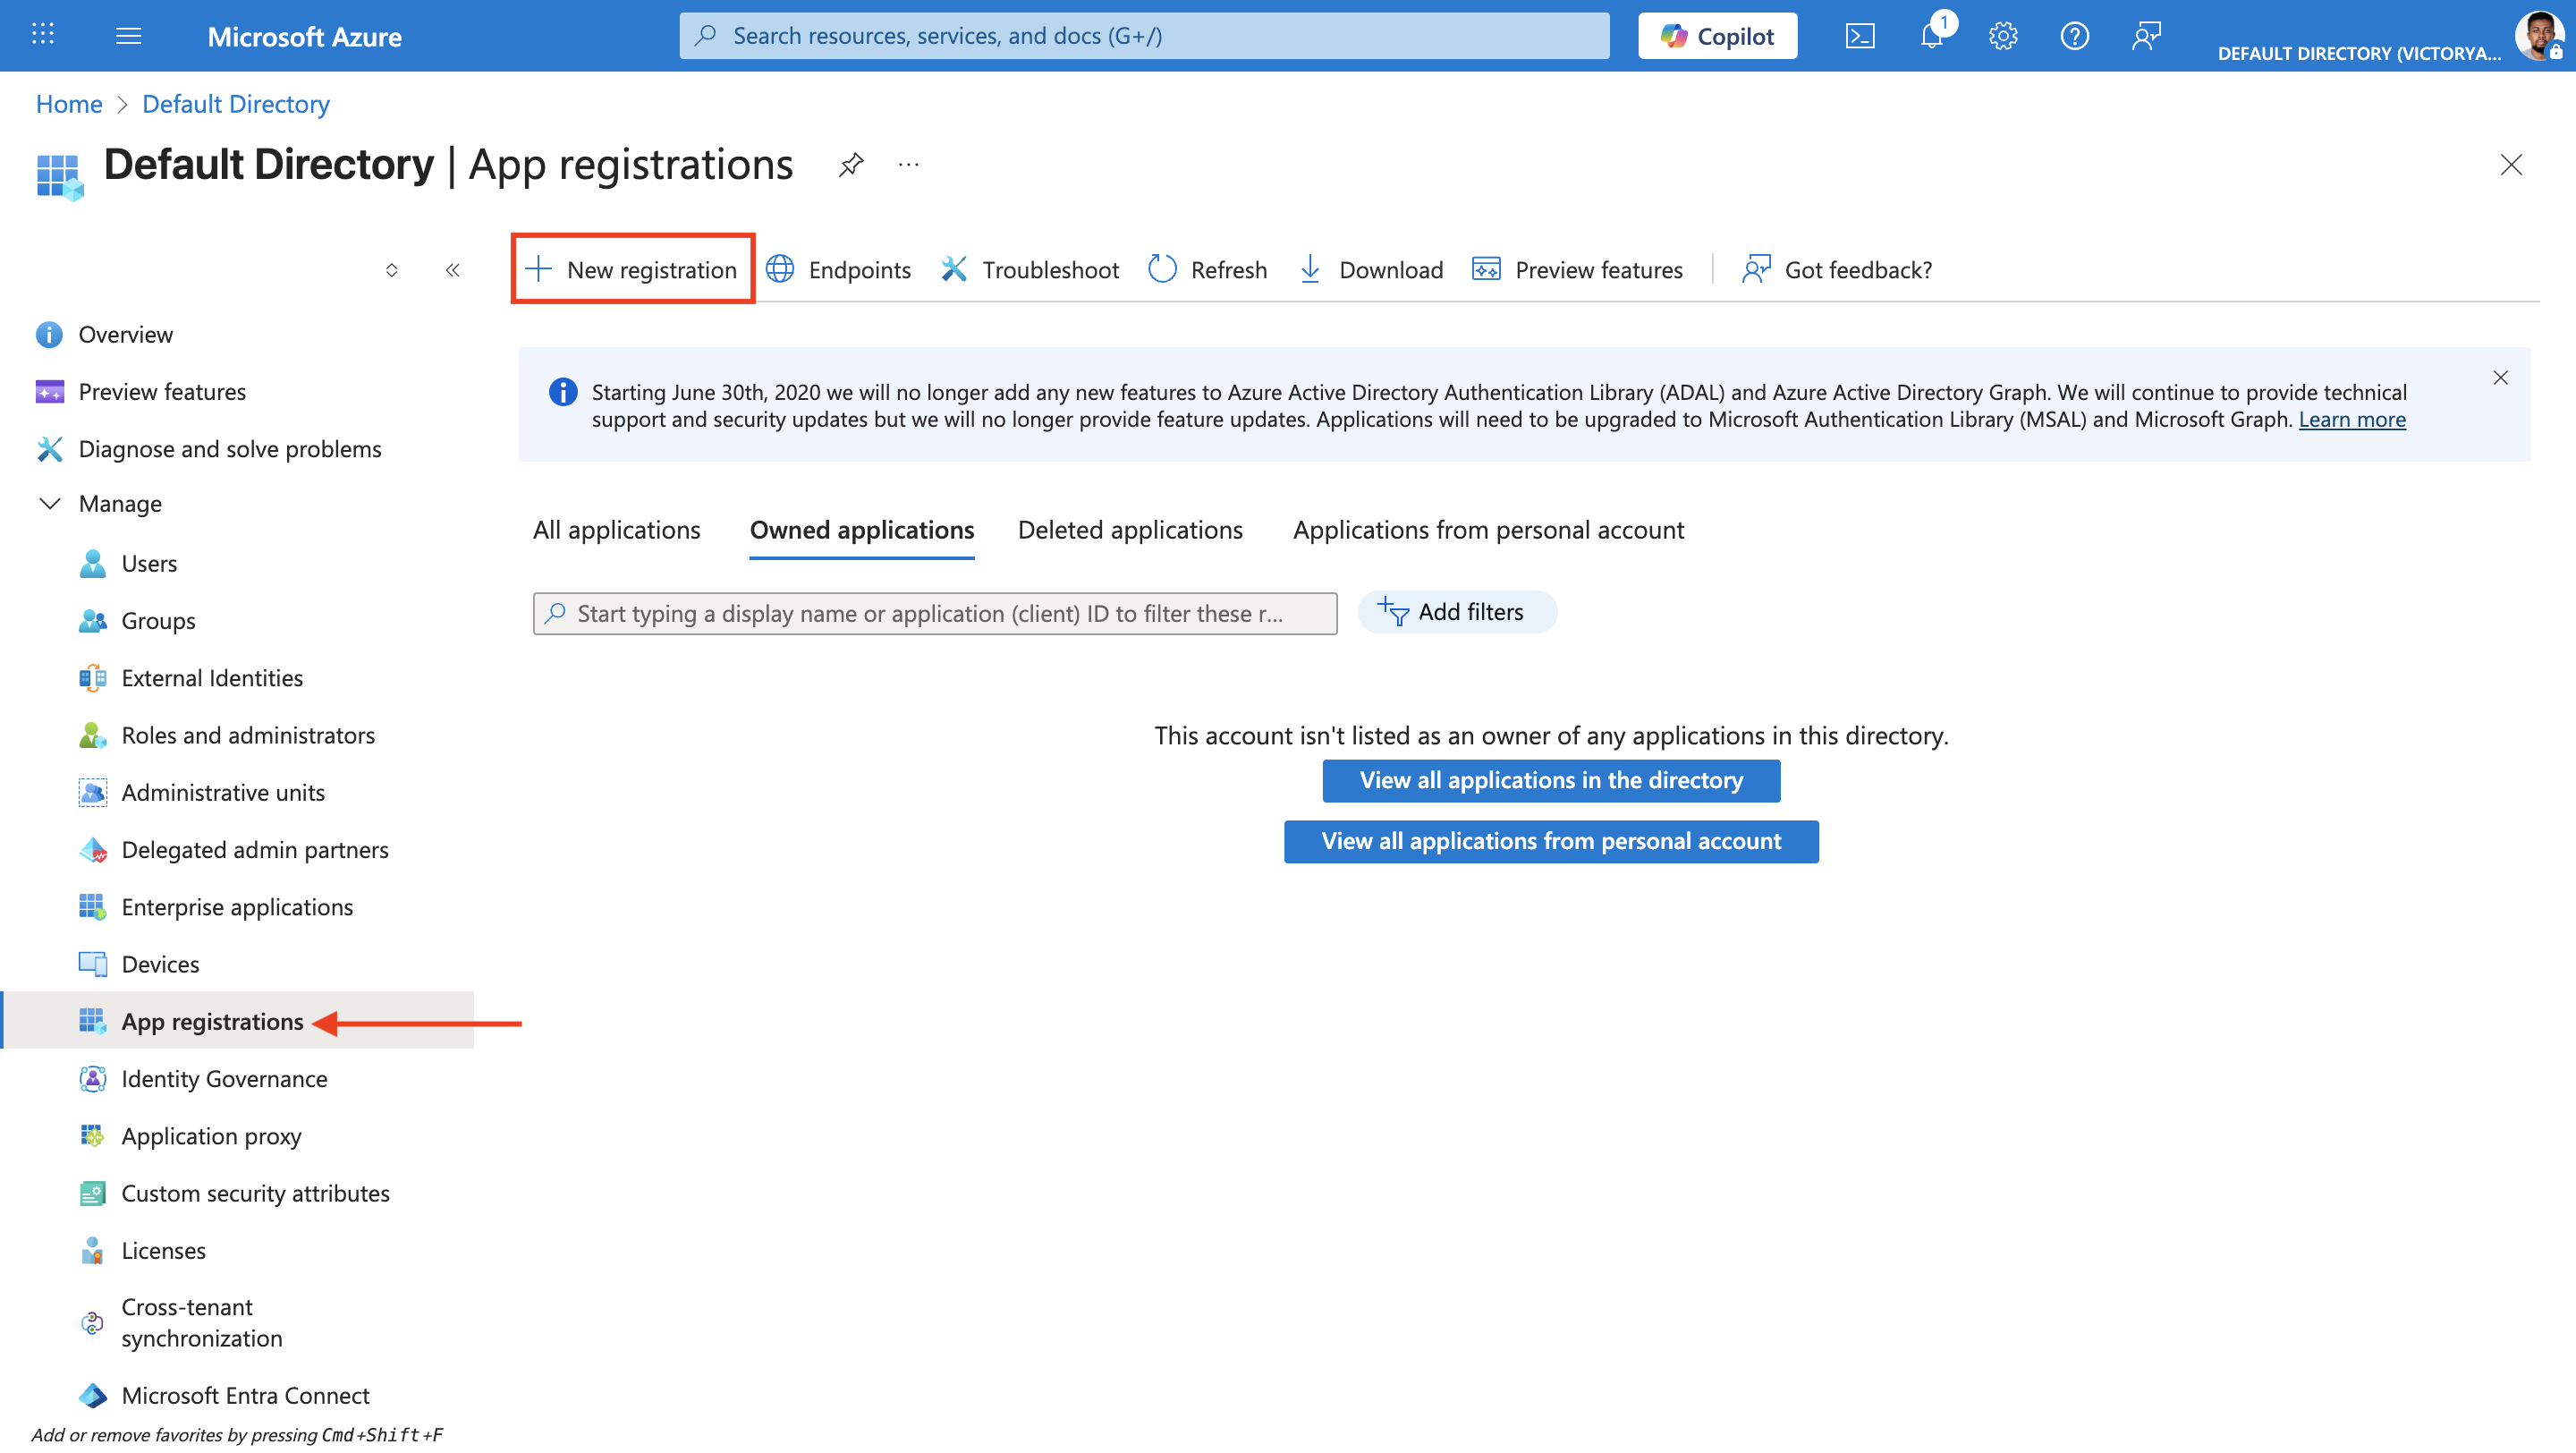
- Log in to the Azure Portal.
- In the left menu, select Microsoft Entra ID (formerly Azure Active Directory).
- In the left menu, under the Manage section, select App registrations.
- Click New registration to create an application.
- Fill in the form:
- Name: Enter any name of your choice
- Supported account types: Select Accounts in any organizational directory (Any Microsoft Entra ID directory - Multitenant).
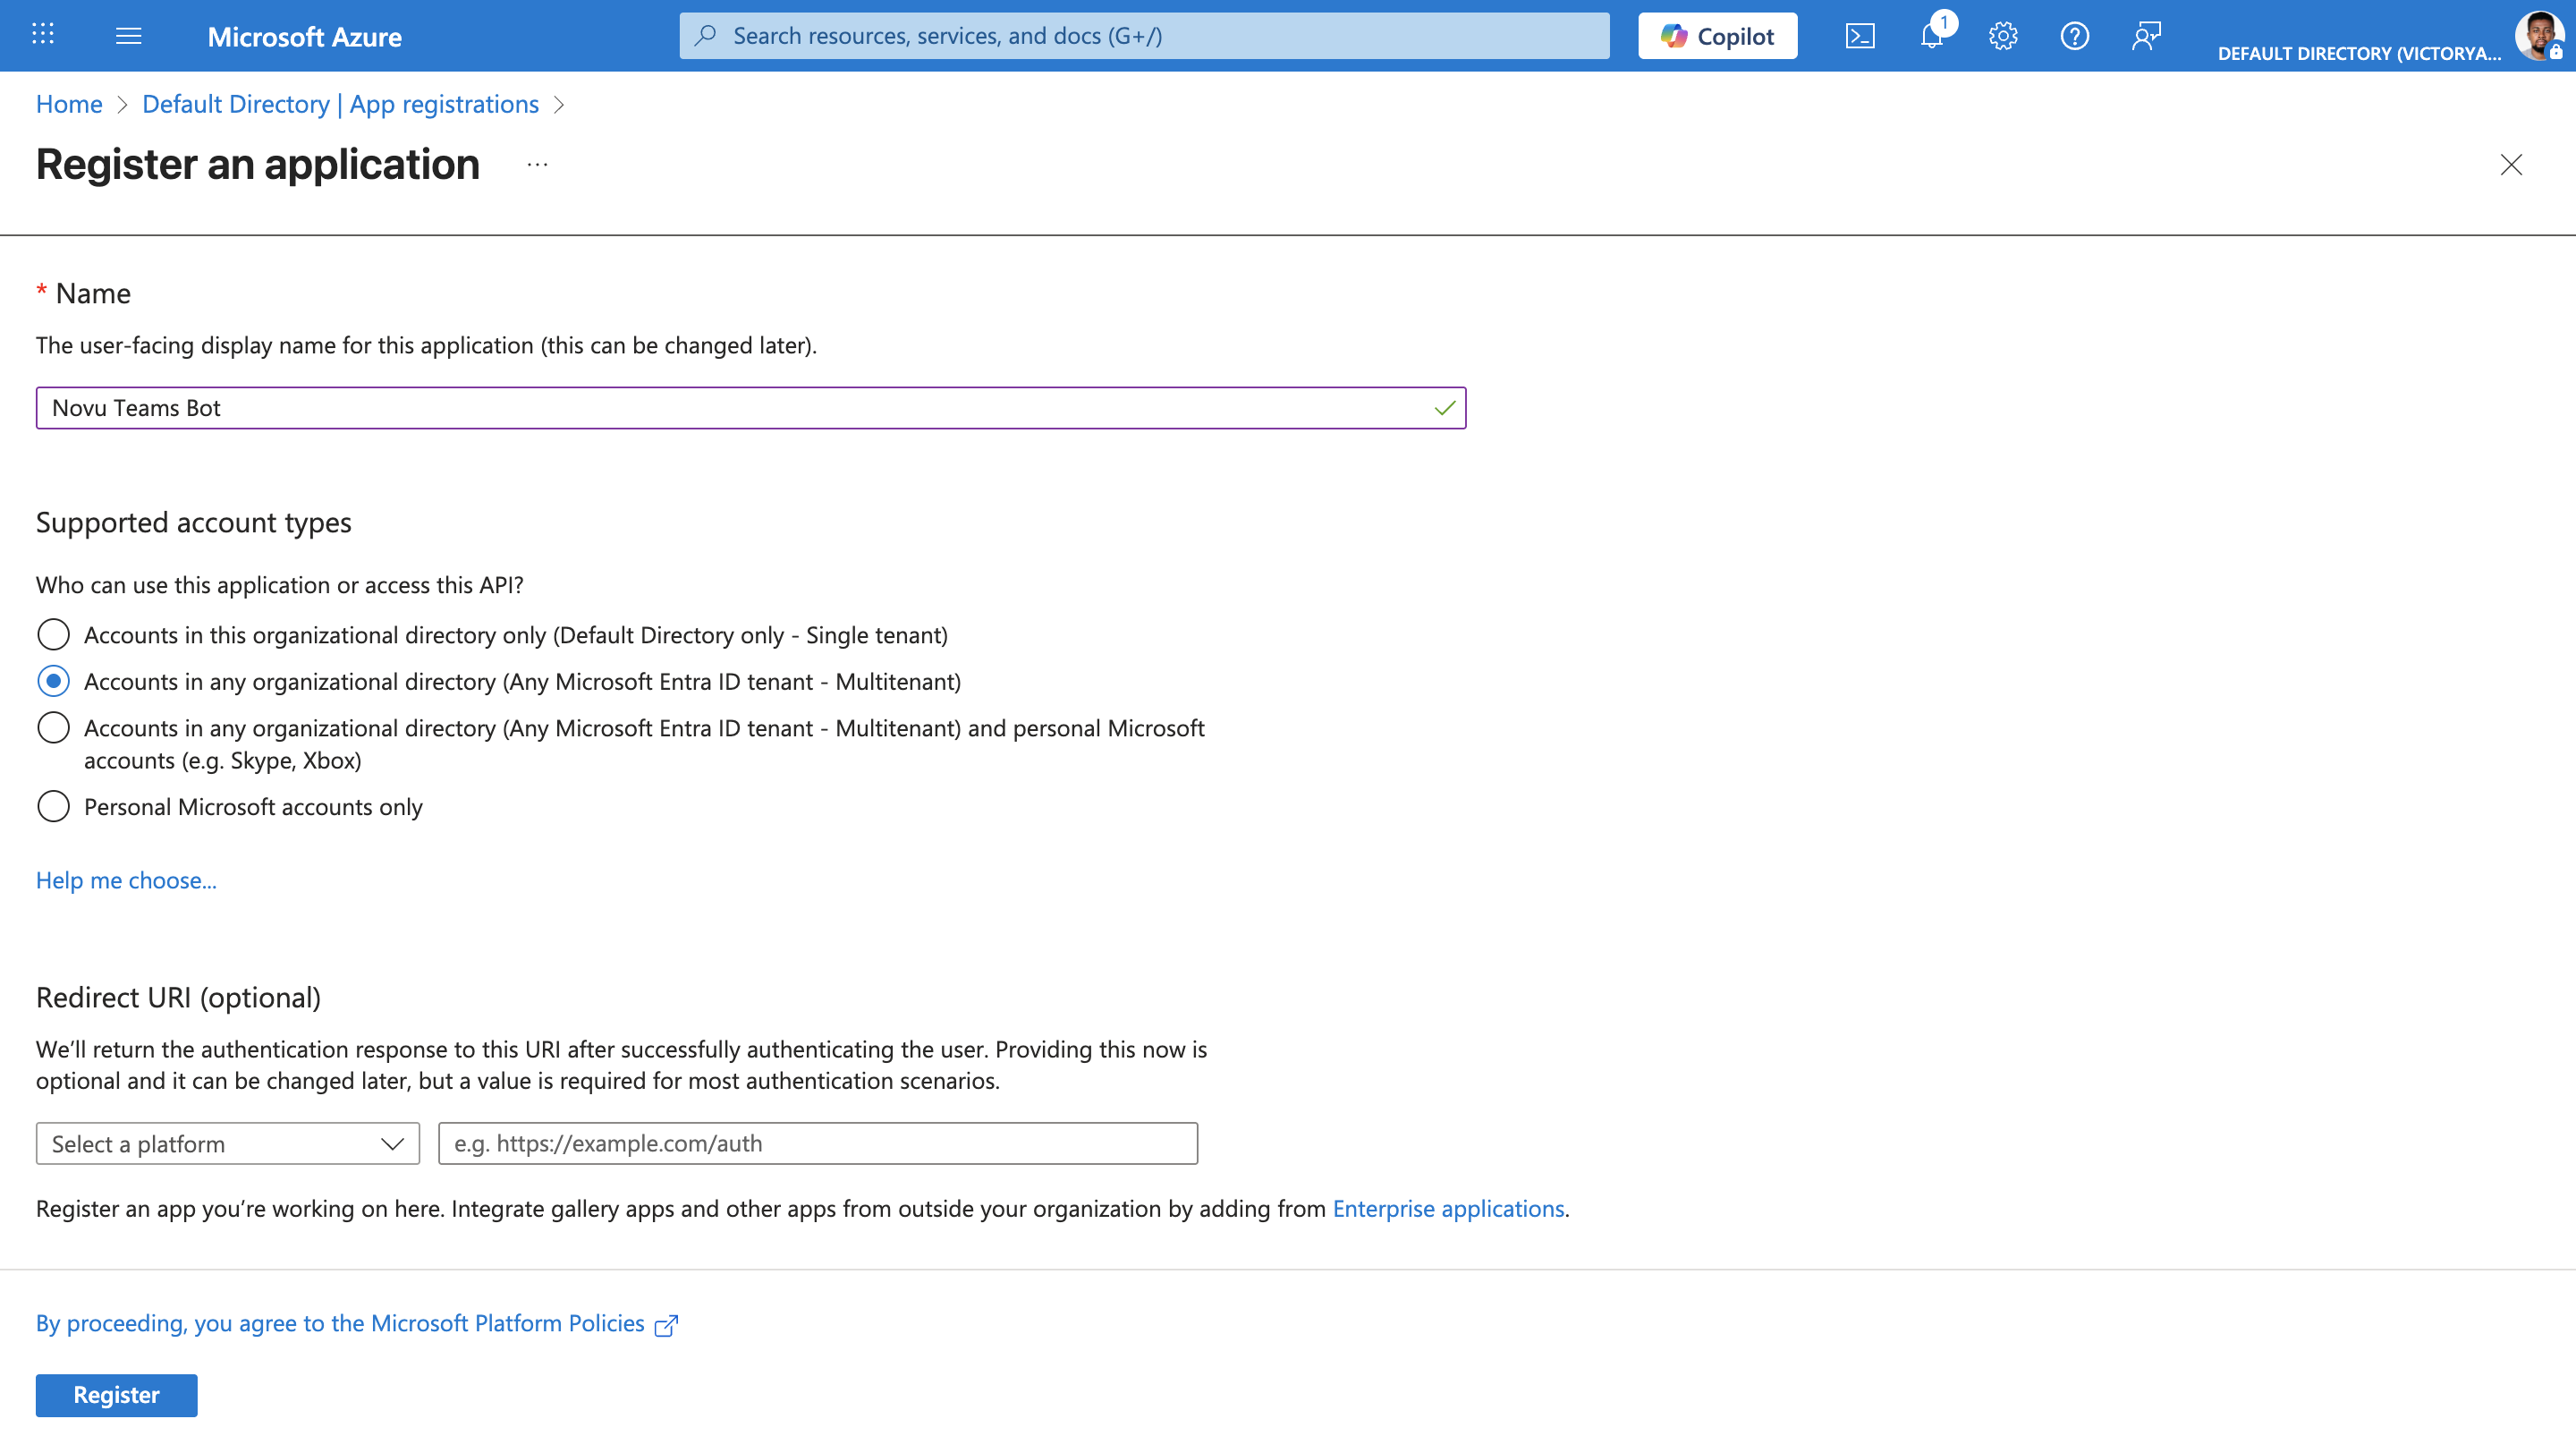
- Click Register.
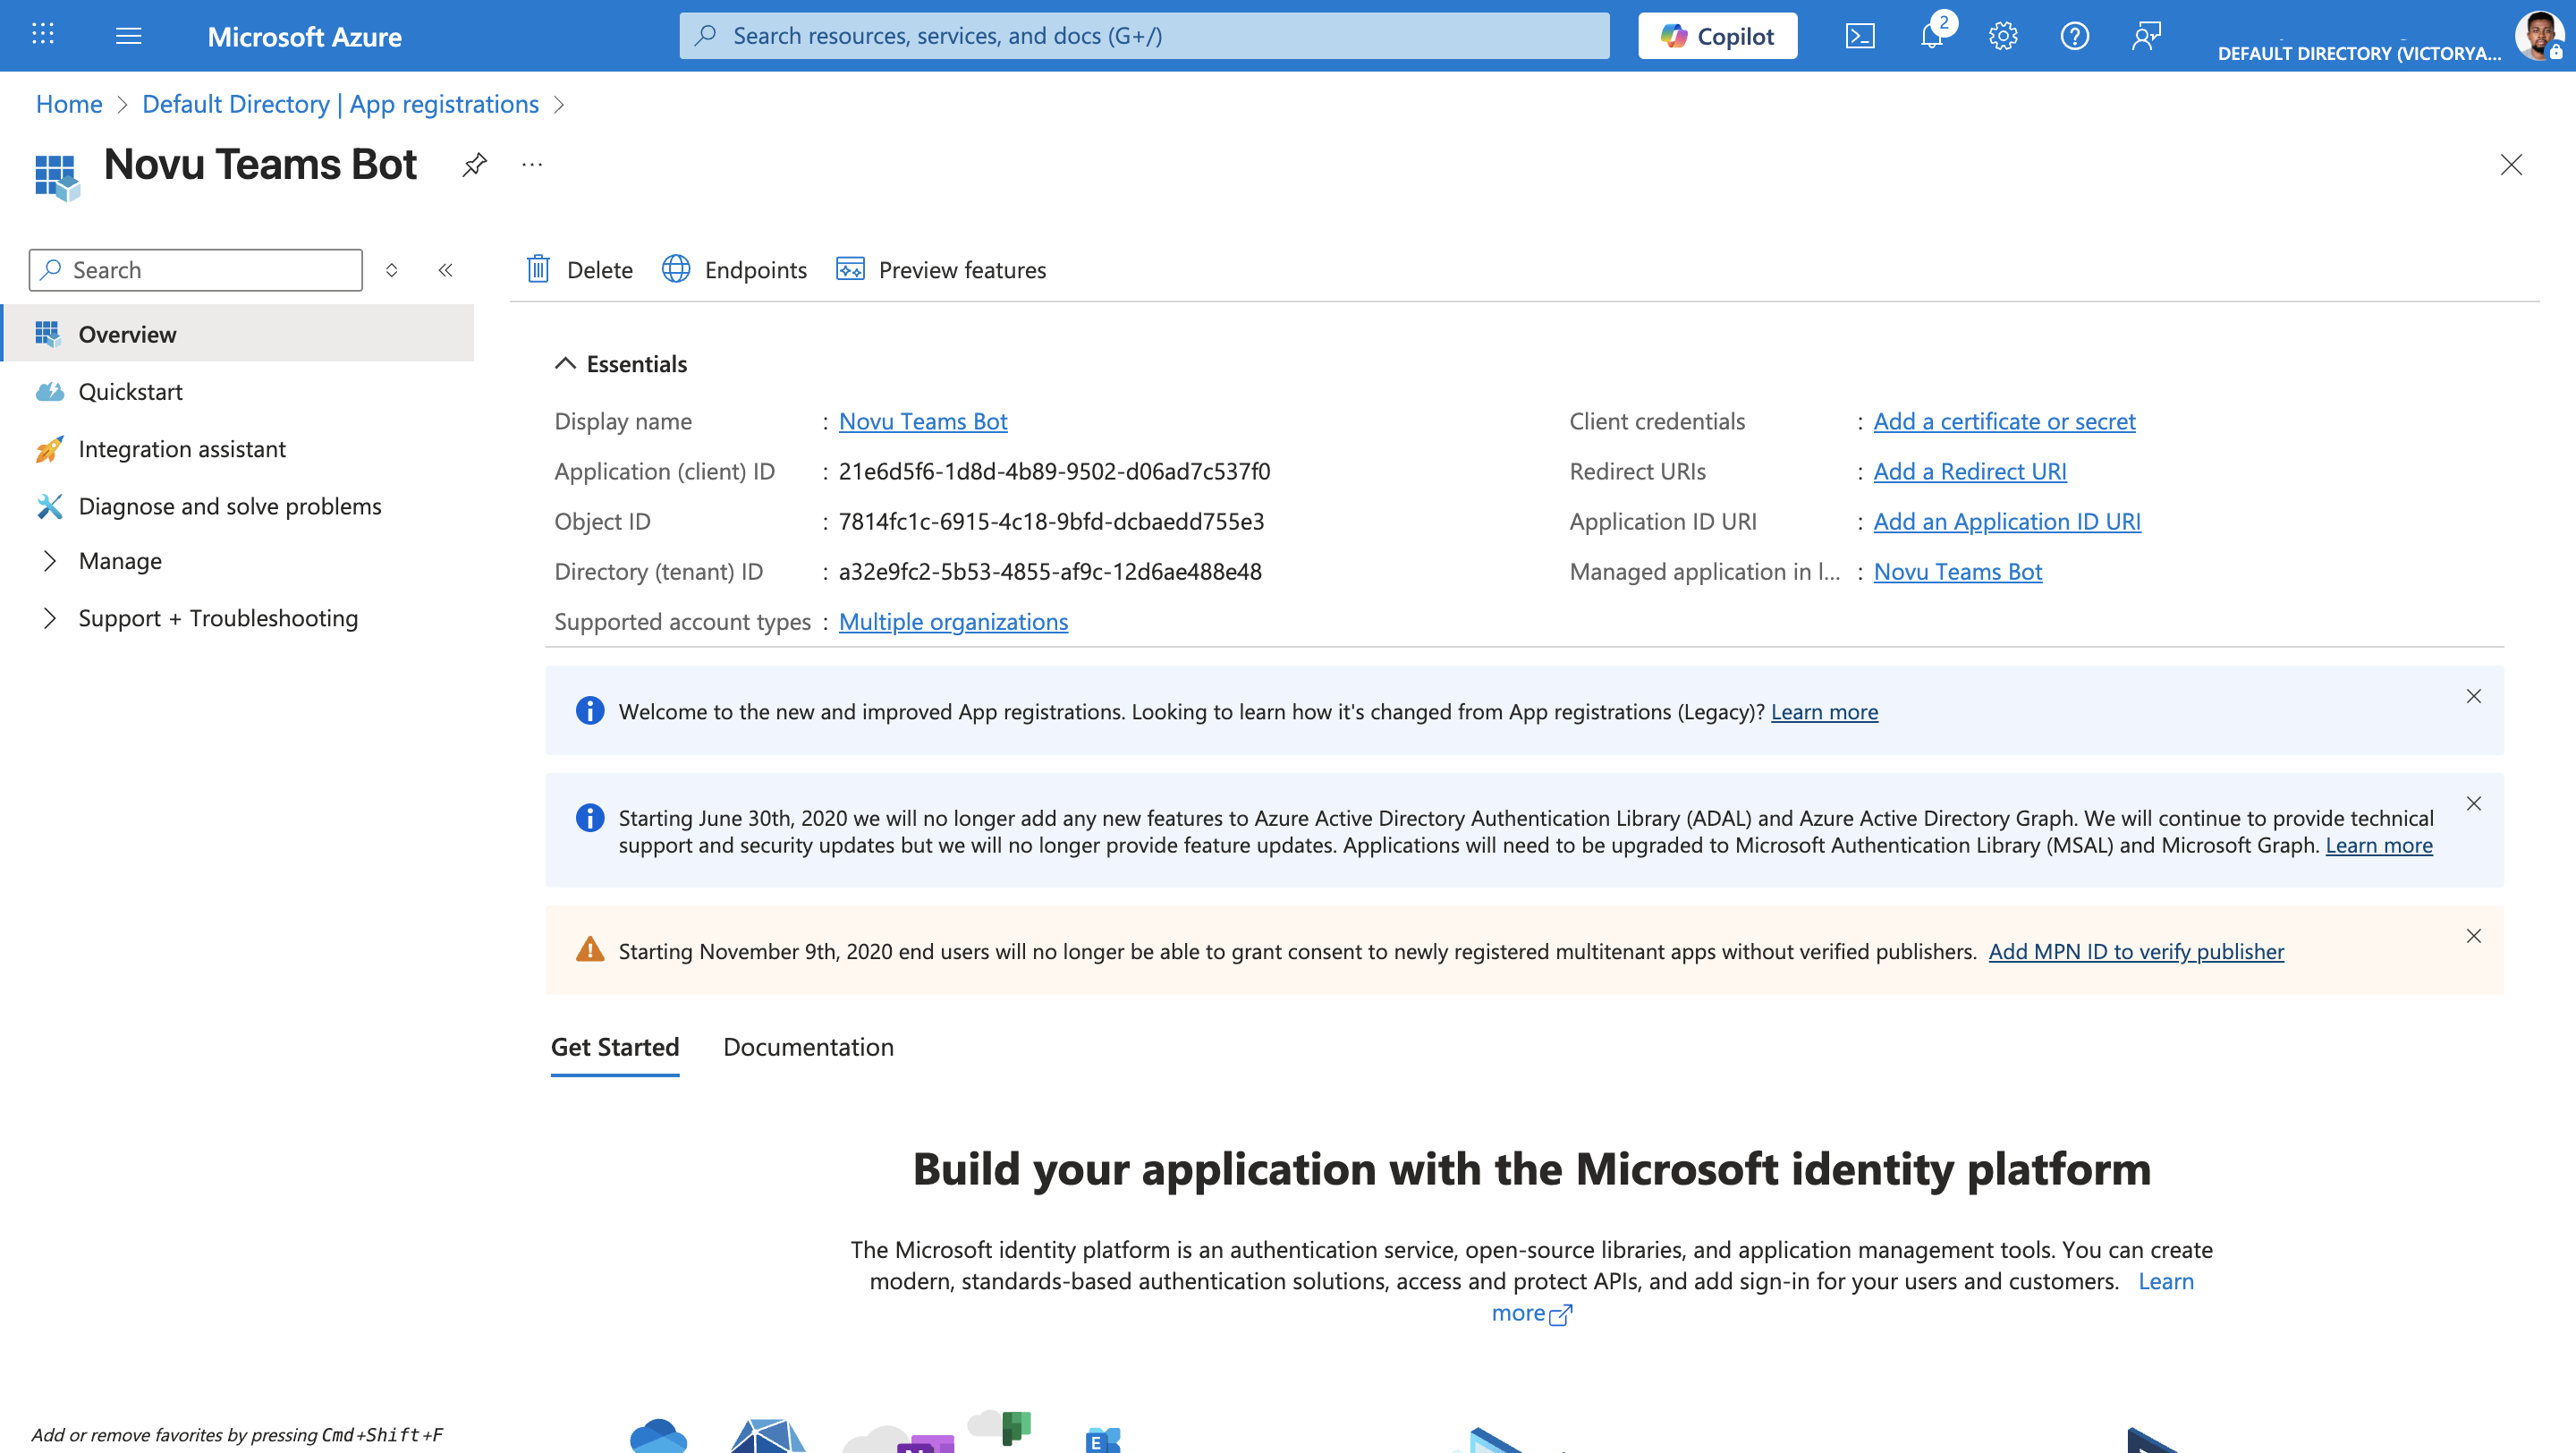
- After creation, note the Application (client) ID and Directory (tenant) ID, they will be required to configure MS Teams in Novu.
Configure client secret
- From your new app's overview page, in the left menu, go to Certificates & secrets.
- Click New client secret.

- Add a description and set an expiration.
- Click Add
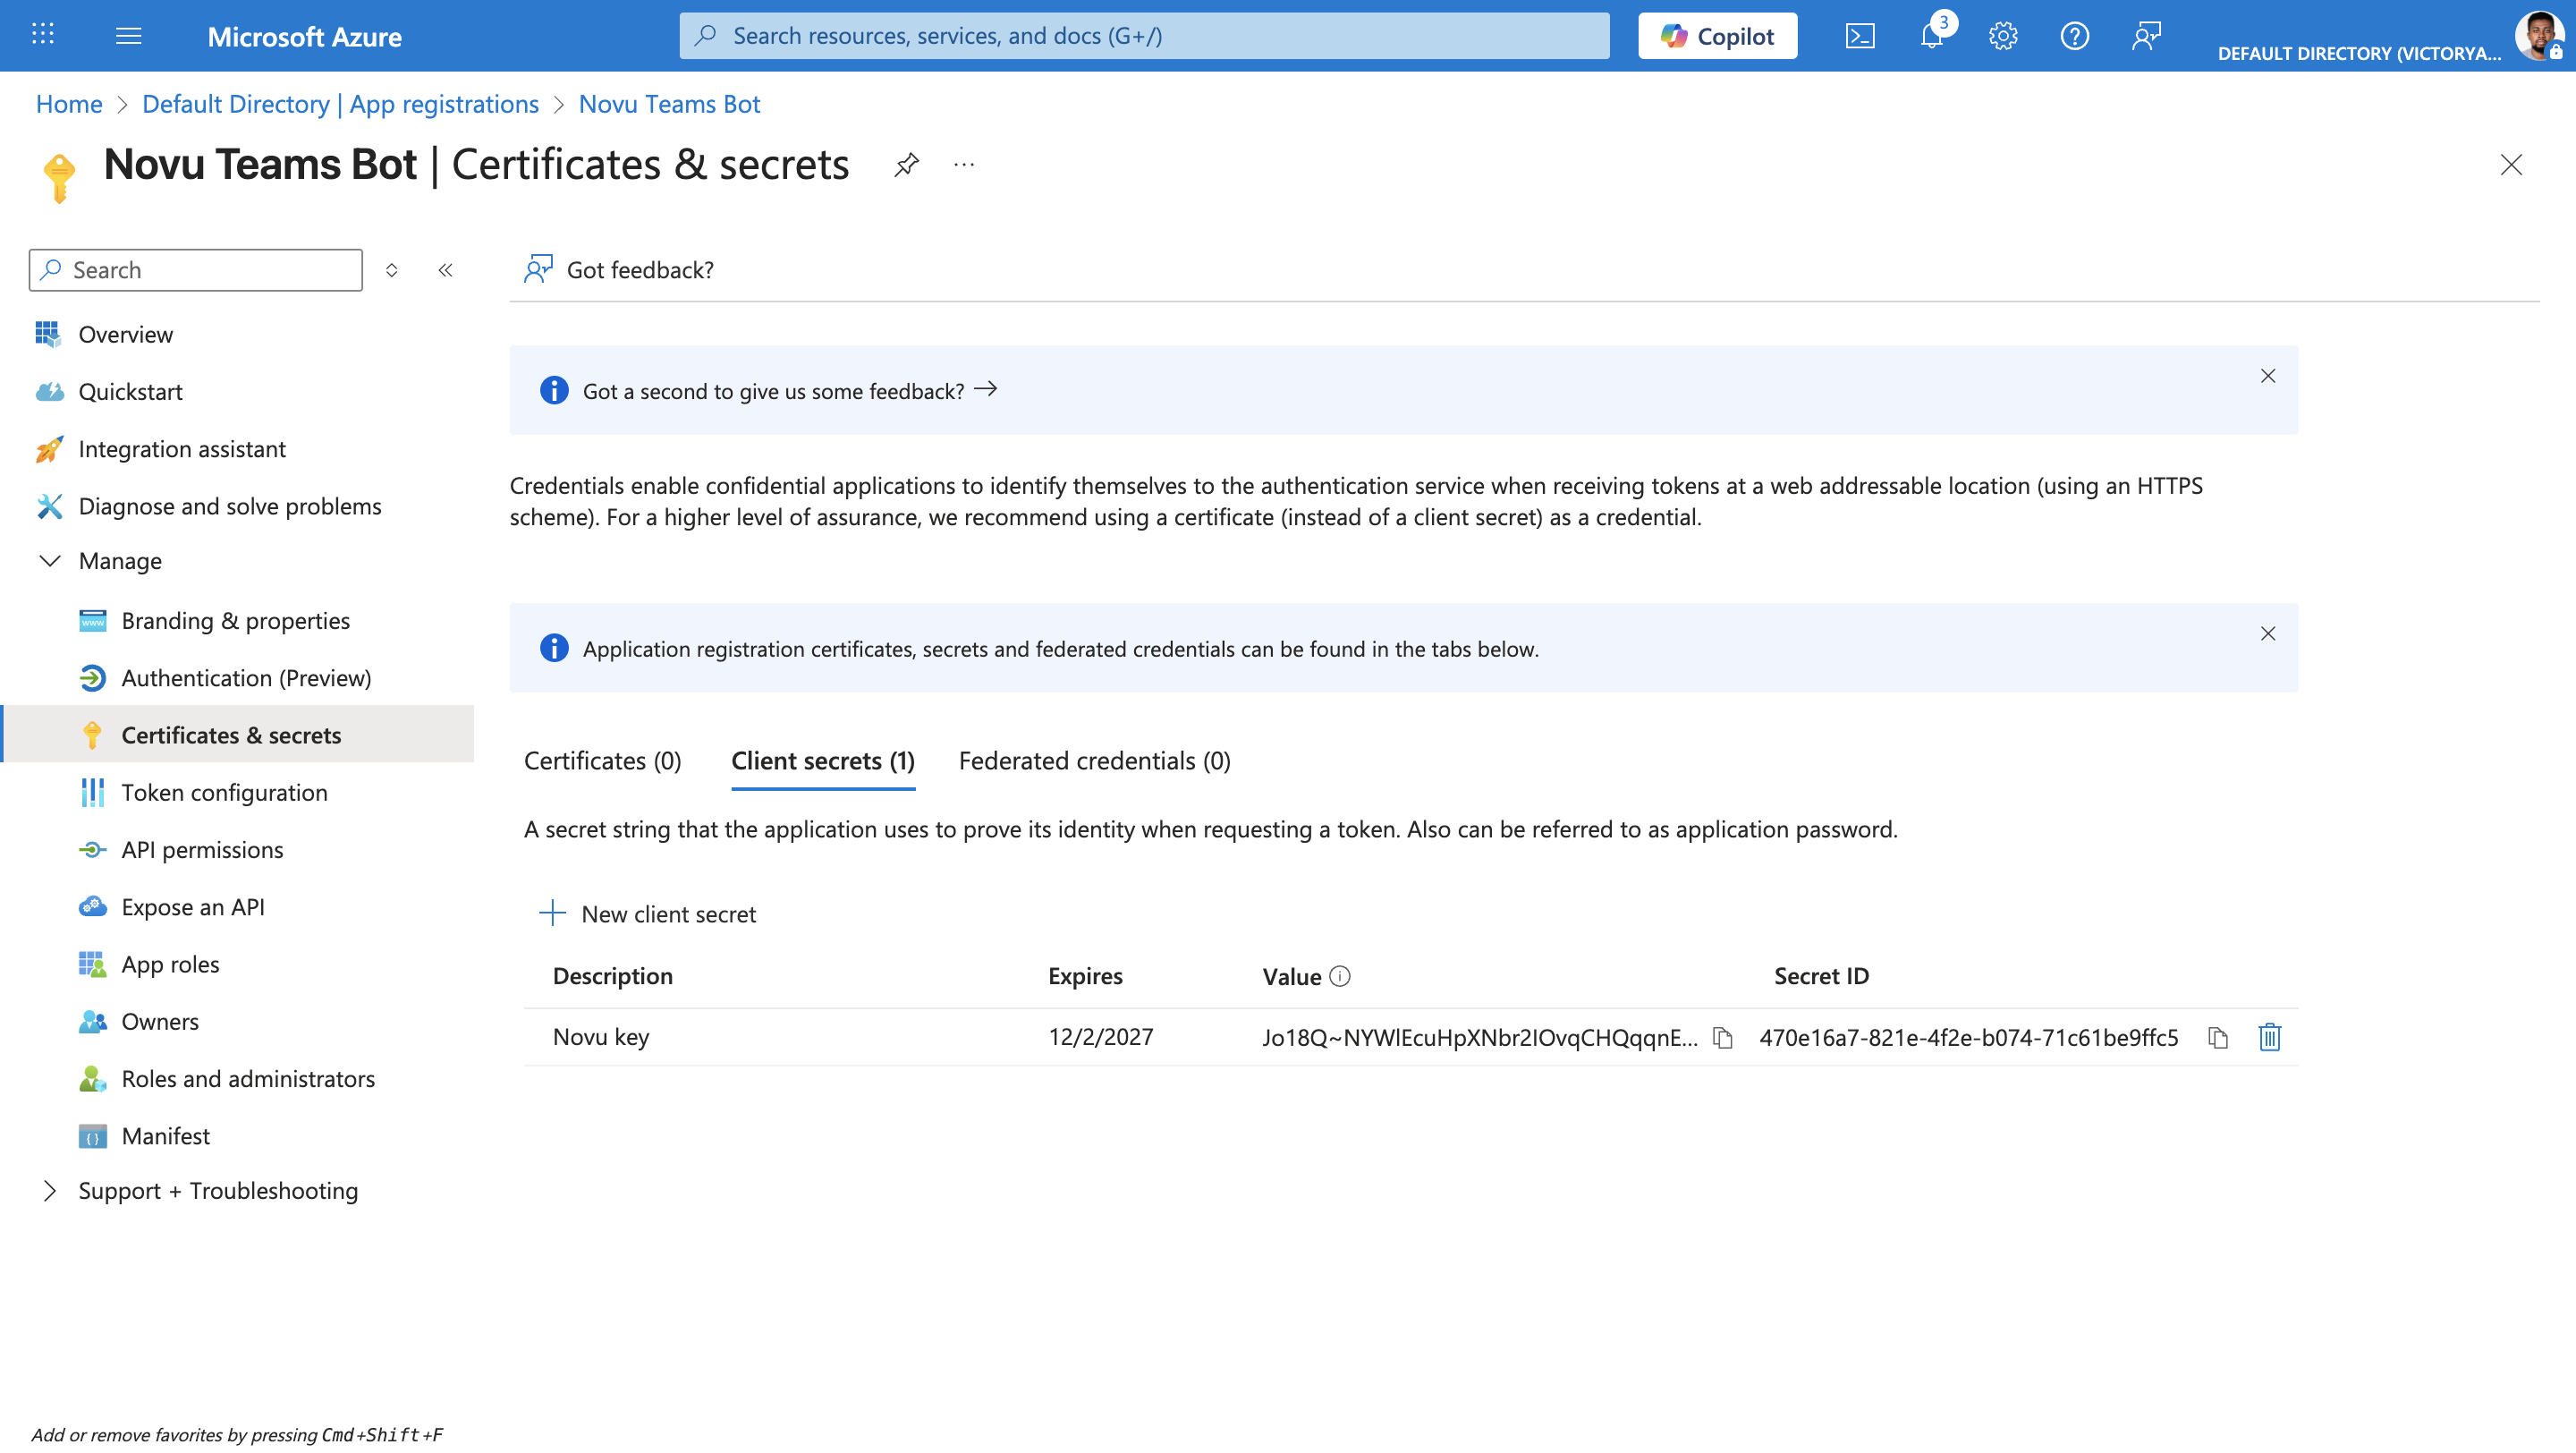
- Copy the Value. This is your
BOT_APP_SECRET, you'll need to paste it into Novu. This value cannot be viewed, except for immediately after creation. Be sure to save the secret when created before leaving the page.
Add Novu’s redirect URI
After your customers go through the admin consent page. Microsoft must know where to send the result (Novu).
- In the app sidebar, go to Authentication (Preview).
- Click Add Redirect URI
- In the menu that appears, click Web.
- In the Redirect URI field, set the redirect URI to the Novu OAuth callback URL:
- US region
- EU region
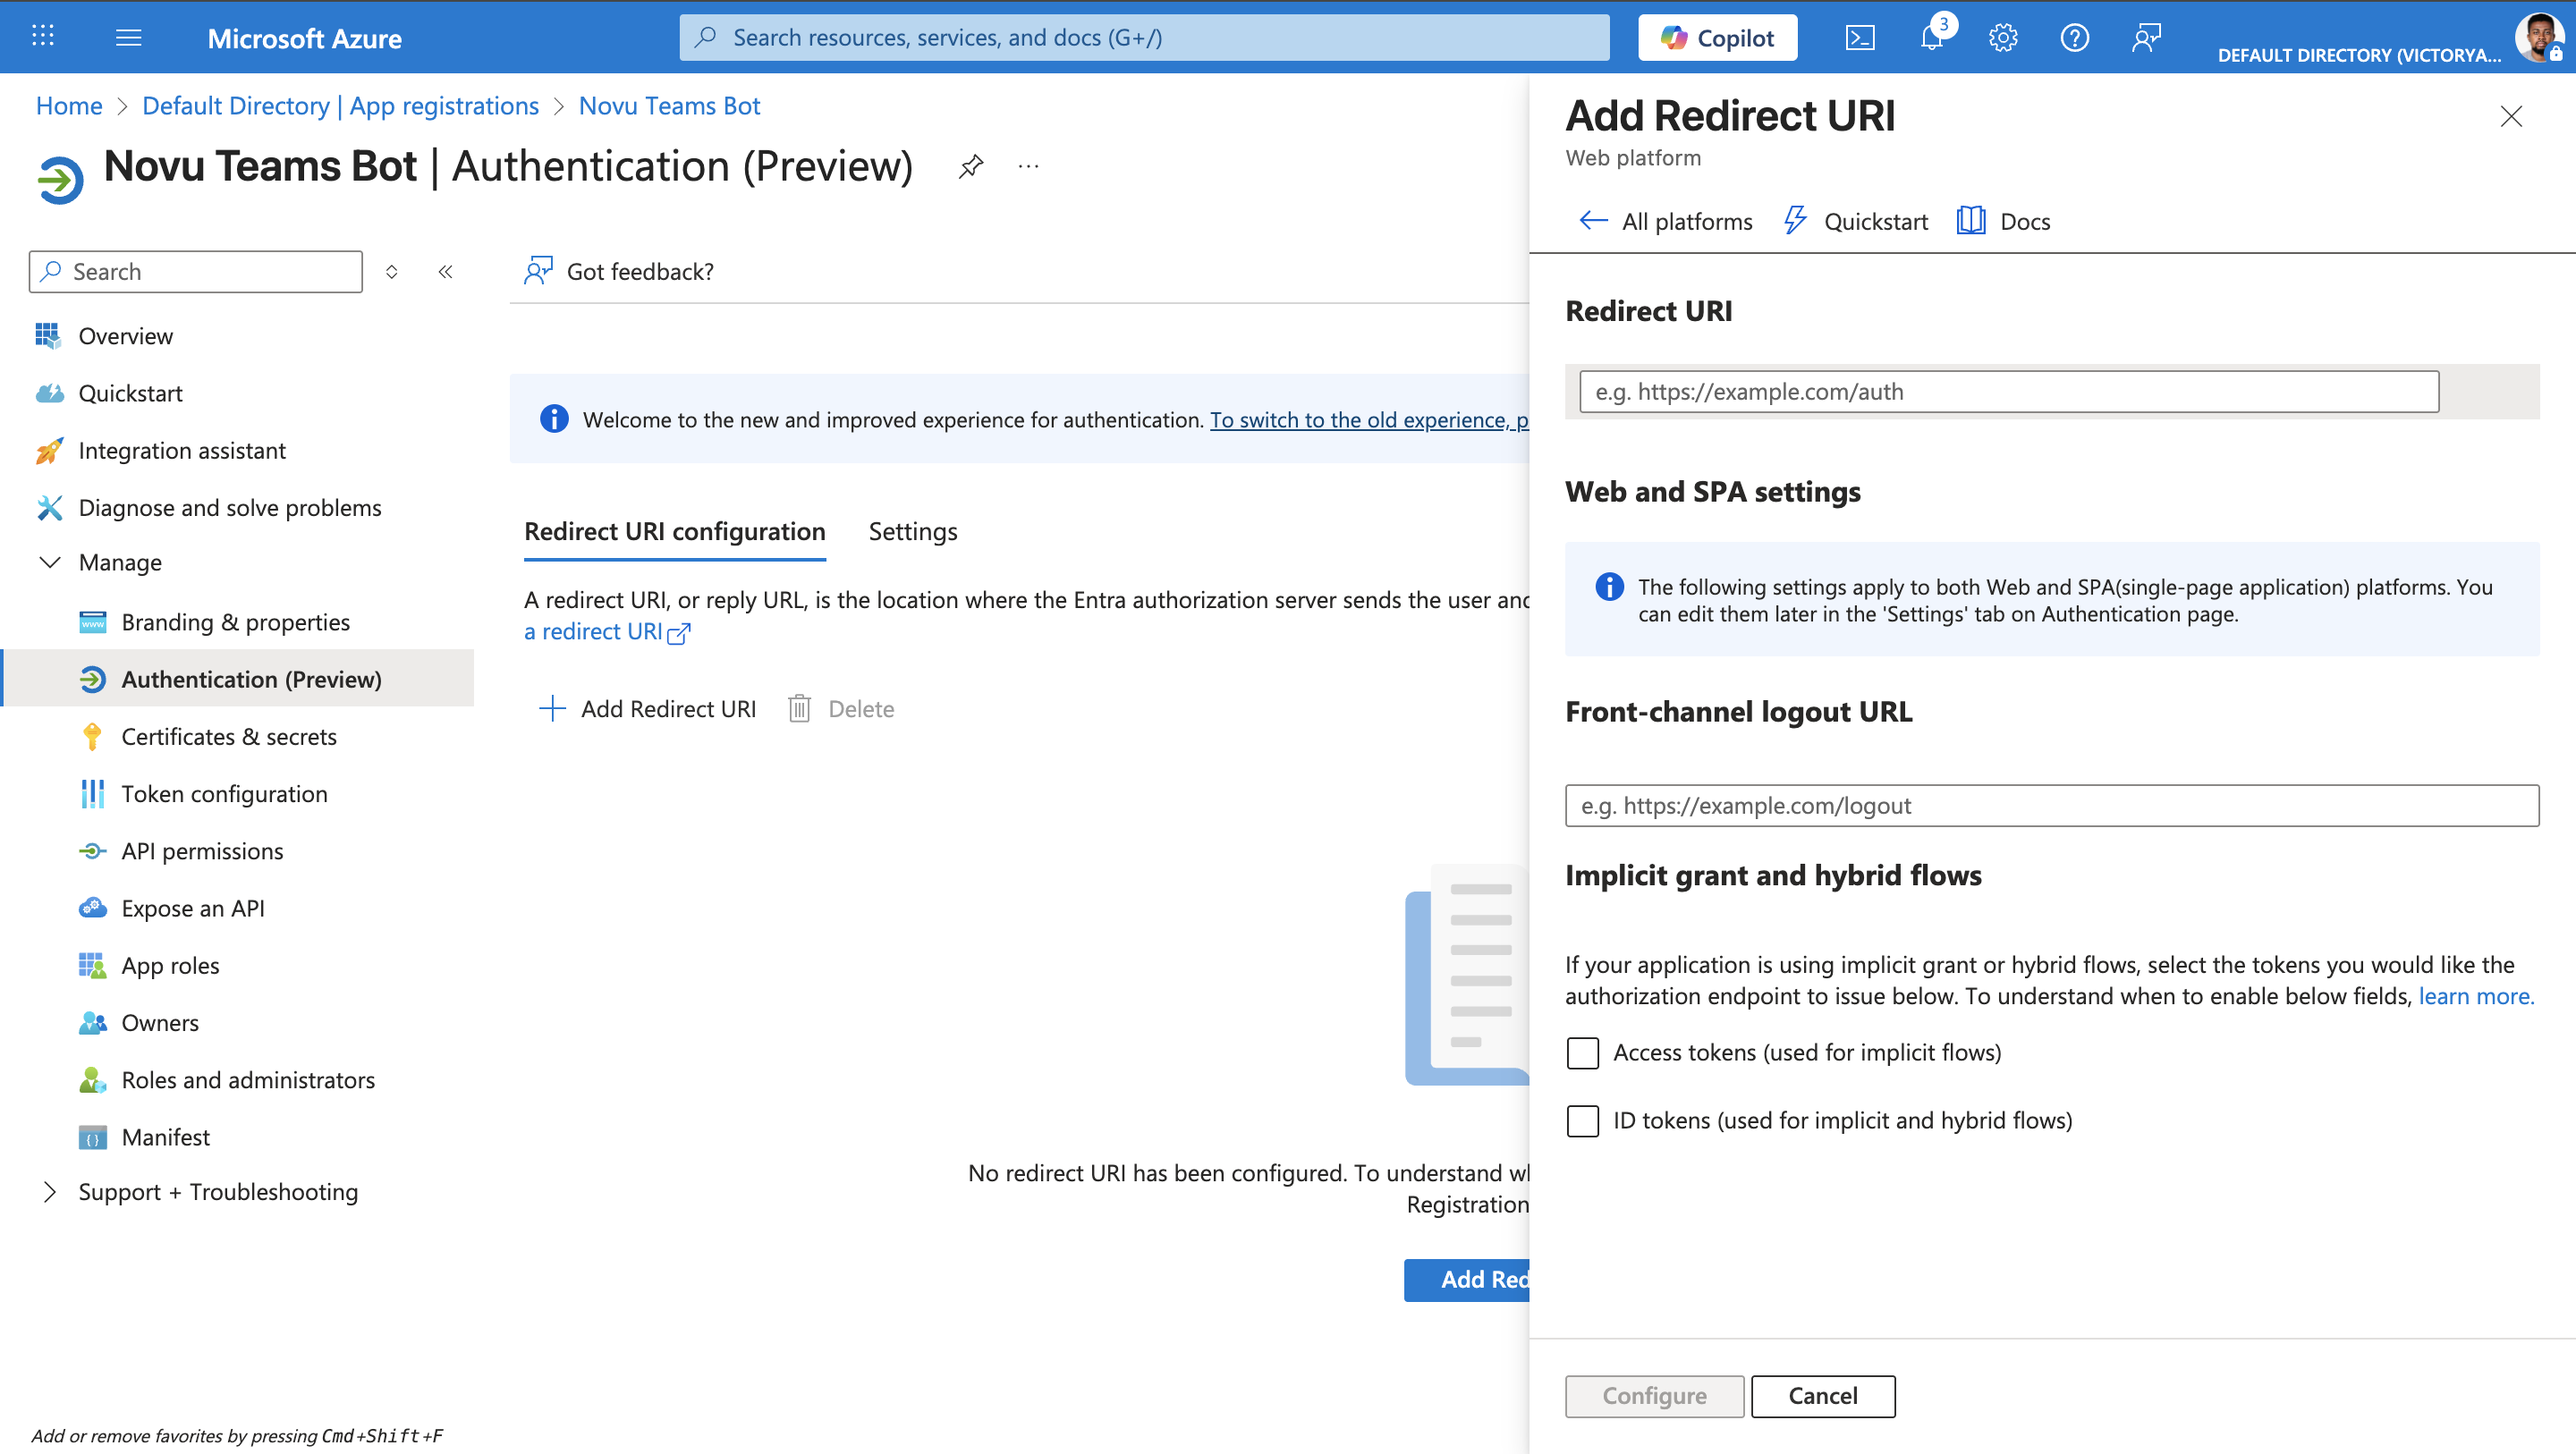
- Click Configure
Add Microsoft Graph application permissions
These permissions lets your app list teams and channels to determine where messages should be sent.
- In the app sidebar, go to API permissions.
- Click Add a permission.
- Click Microsoft Graph.

- Click Application permissions.
- Search for and check the following permissions:
Team.ReadBasic.AllChannel.ReadBasic.AllAppCatalog.Read.AllTeamsAppInstallation.ReadWriteSelfForTeam.All(optional, for automation)TeamsAppInstallation.ReadWriteSelfForUser.All(optional, for automation)
- Click Add permissions.
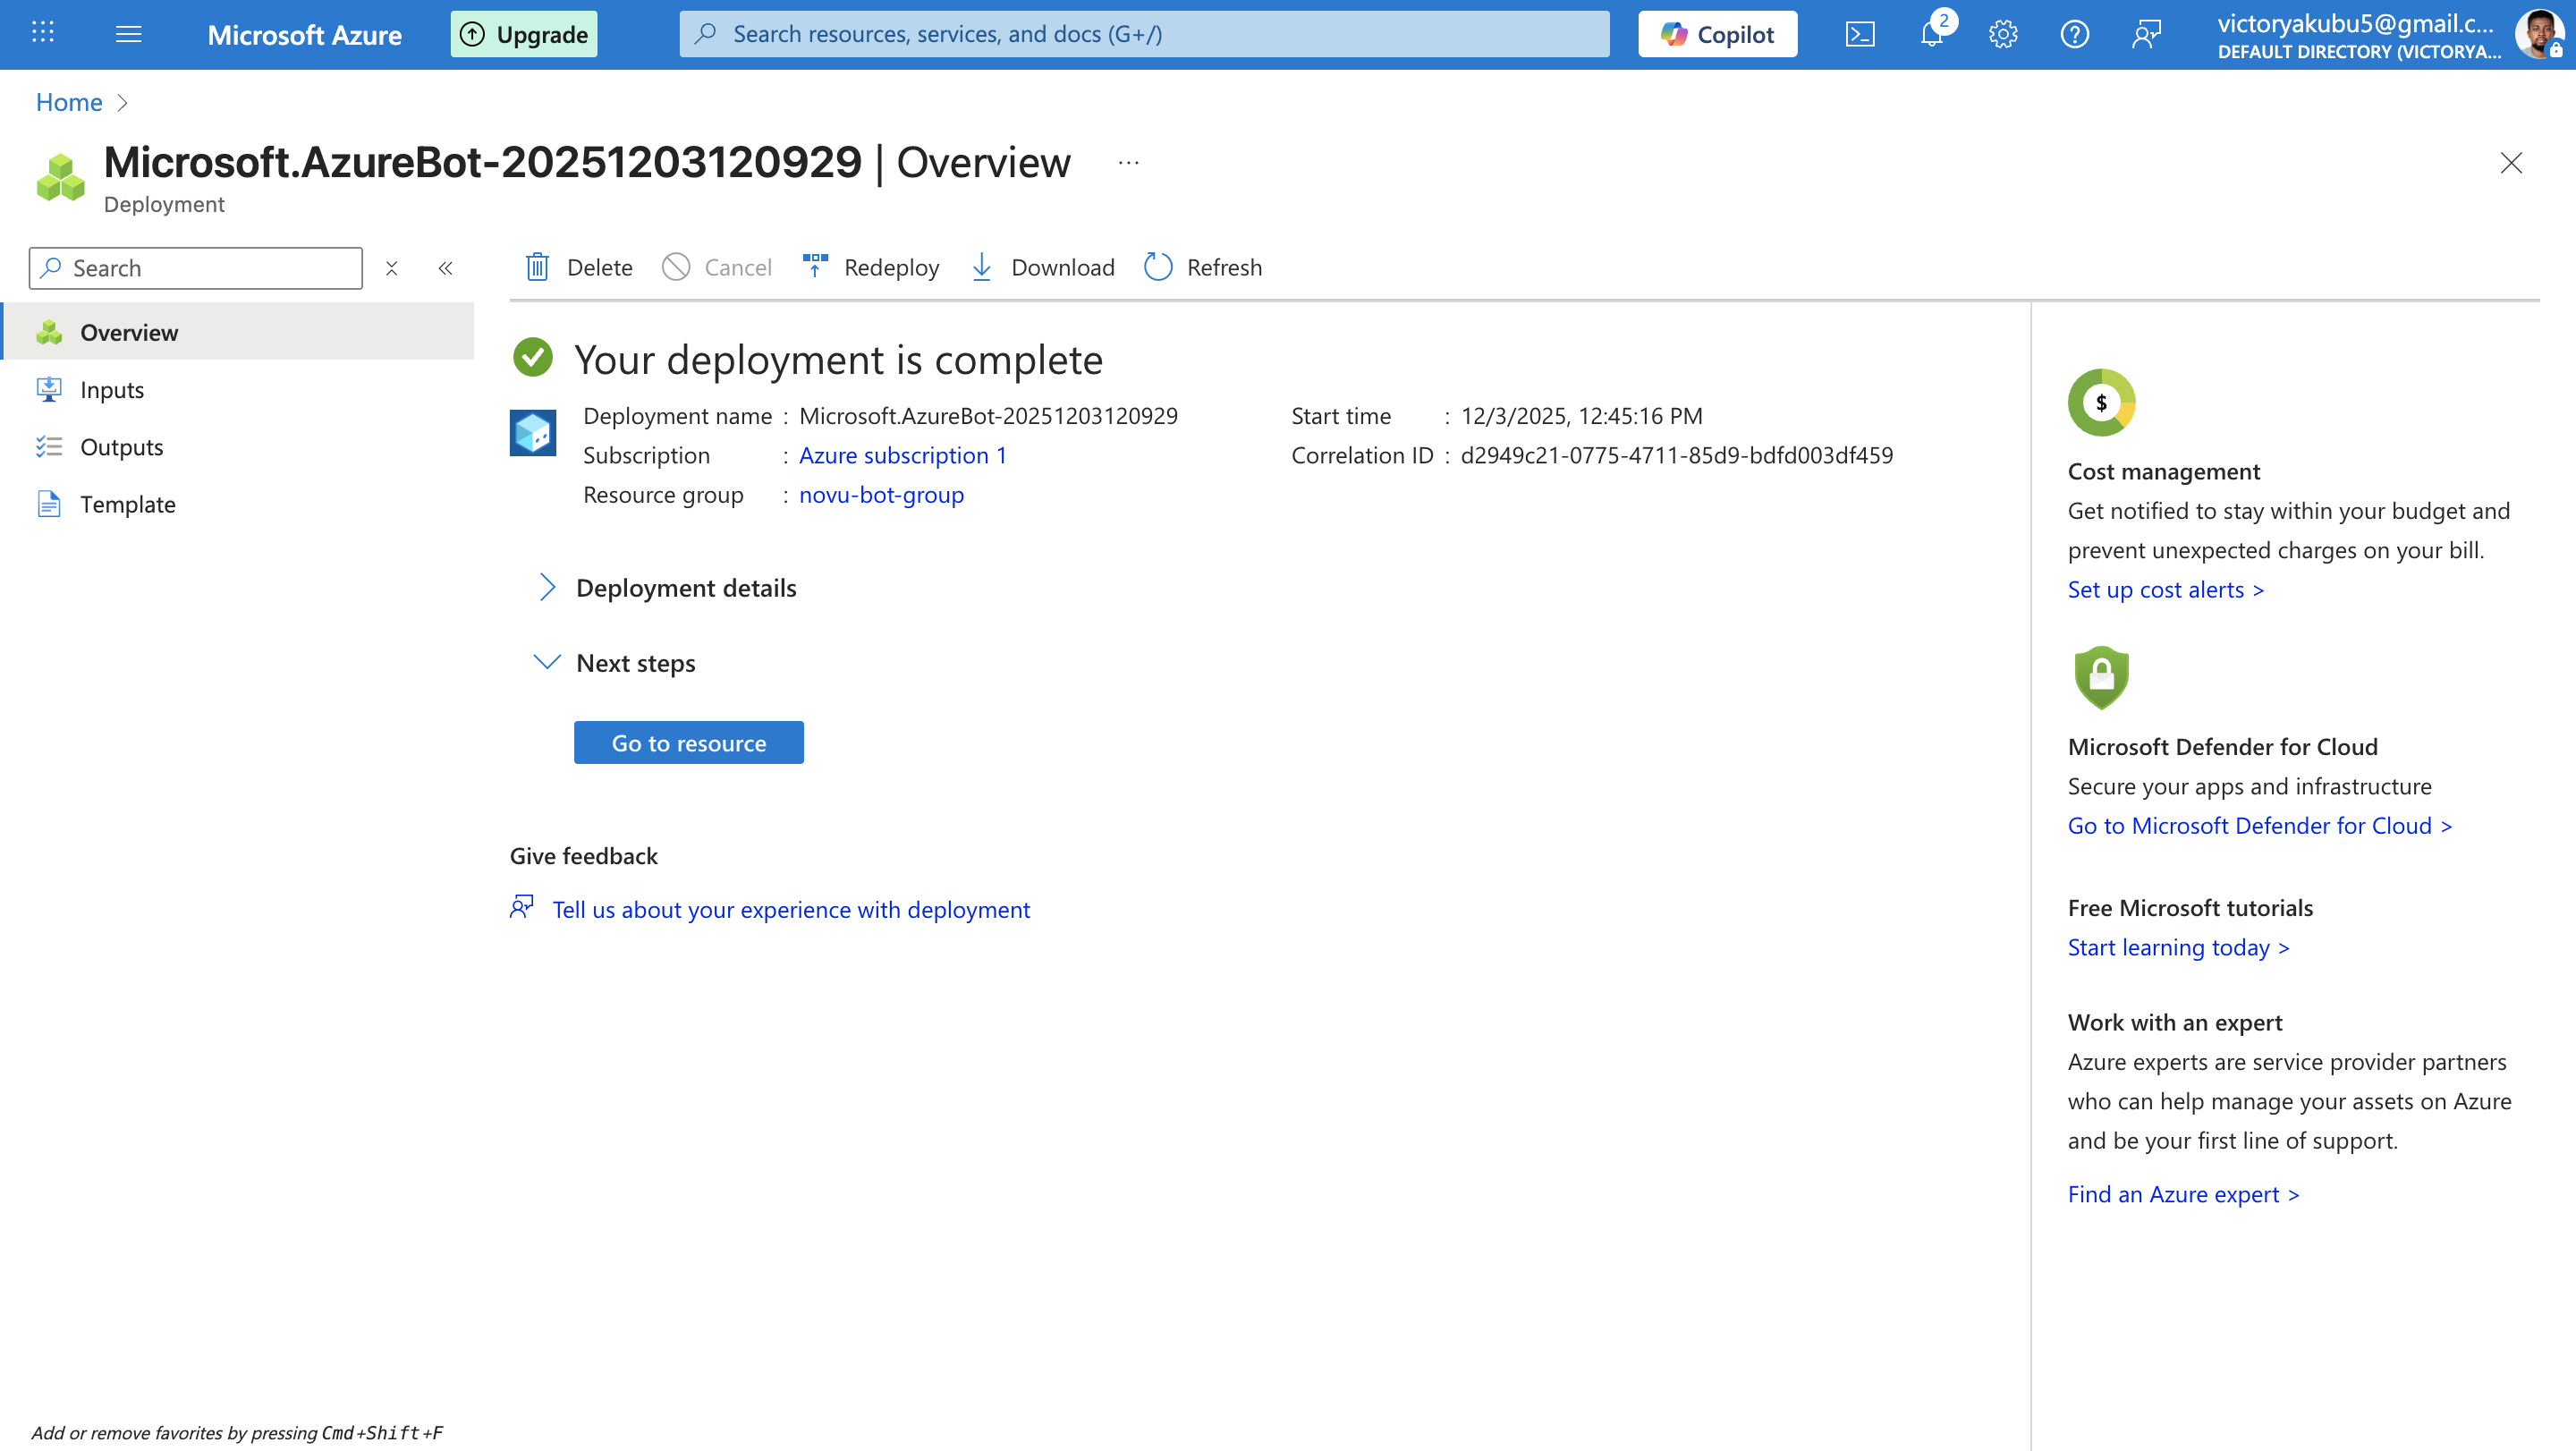
Create an Azure Bot resource
Now you register your bot with the Azure AI Bot Service and link it to the app registration you just created. In the Azure portal, click Create a resource.
- In the Azure portal left menu,, click Create a resource.
- Search for “Azure Bot” and select the Azure Bot resource.

- Click Create.
- Fill in the basics:
- Bot handle: This is a unique display name in Azure.
- Subscription: Select the Azure subscription.
- Resource group: A resource group is a collection of resources that share the same lifecycle, permissions, and policies, you can either select or create one.
- Data residency: Specify an option for data residency, either global or regional.
- Under Microsoft App ID:
- Type of app: Select Single-tenant app registration.
- Creation type: Choose “Use existing app registration” and use app IDs you created earlier:
- App ID: Replace with the Application (client) ID.
- App tenant ID: Replace with the Directory (tenant) ID.
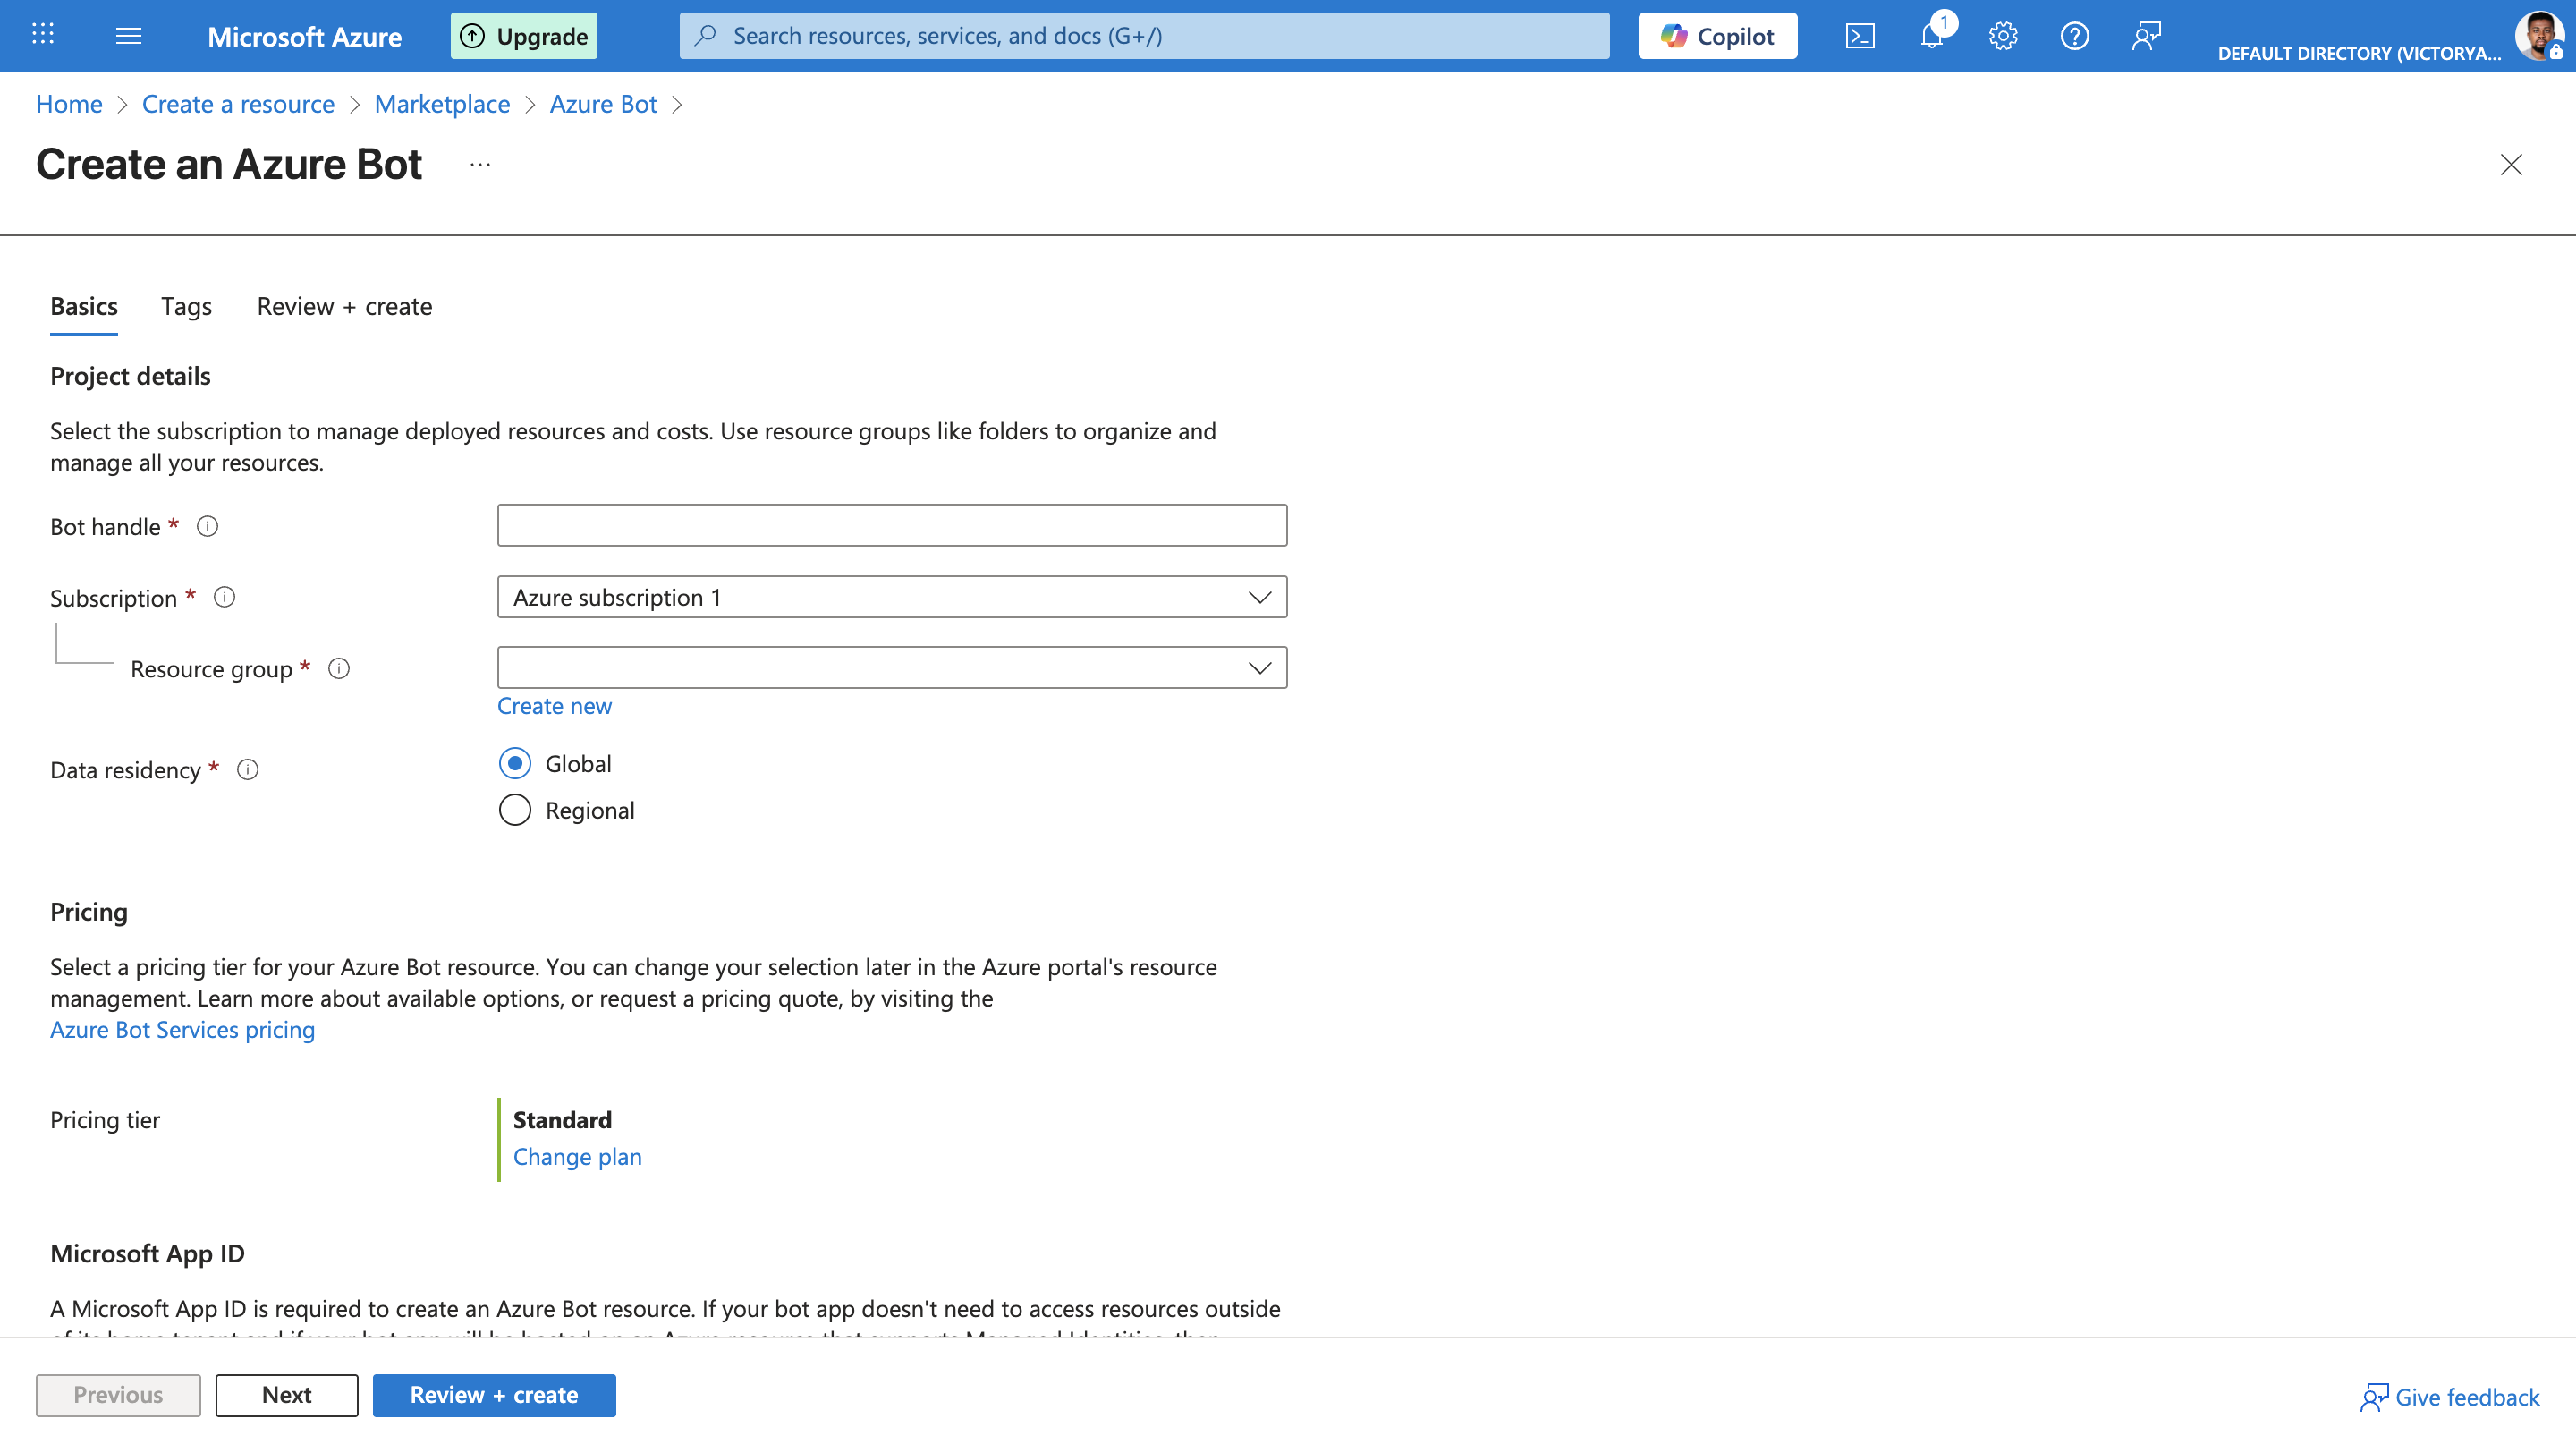
- Click Review + create.
- Click Create.
Enable the Microsoft Teams channel
This connects your bot resource to Teams and is required for your Teams app to install cleanly.
- Once the deployment finishes, click Go to resource.
- In the left menu, go to Settings
- Click Channels.
- In the available channelssection, click Microsoft Teams.
- In the menu that appears, accept the terms of services.
- In the Messaging section, choose the appropriate environment (typically Microsoft Teams Commercial).
- Click Apply
Create a Teams app
Now you create the Teams “wrapper” around your app registration and bot.
- Open the Teams Developer Portal.
- Click Apps.
- Click + New app and then enter a name.
- Click Add.
- In the basic information page, fill in the required fields.
- In the left menu, select App feature.
- Add a Bot and choose “Enter a bot ID”
- Set the Bot ID to your
BOT_APP_ID(the same App ID you used for the Azure Bot). - Enable “What can your bot do?” to at minimum “Only send notification”
- Enable scopes based on your usecase:
team(for channel messages)personal(for DMs)
You don’t need to edit the JSON yourself, The developer portal will generate and validate this for you.
Publish the Teams app
Next, publish the app to a Teams store, if you want the app publicly available in the store or publish to org if you want your App to be accessible only inside your organization teams.
Refer to the Microsoft Teams documentation to learn how to:
Configure the Teams (Bot) integration in Novu
Now that your Azure Bot is configured, you need to provide Novu with the credentials to integrate it.
- Log in to the Novu dashboard.
- In the sidebar, click Integrations Store.
- Click Connect Provider.
- Select Chat and click MSTeams.
- Enter the credentials you saved from the Azure Portal:
- Client ID: Enter your
BOT_APP_ID. - Client Secret: Enter your
BOT_APP_SECRET. - App Tenant ID: Enter your
APP_TENANT_ID(This is your specific tenant ID where the app was registered). - Redirect URL (Optional): If you want to control where your users land after they grant admin consent, enter that URL here. If left empty, the consent window will simply close automatically.
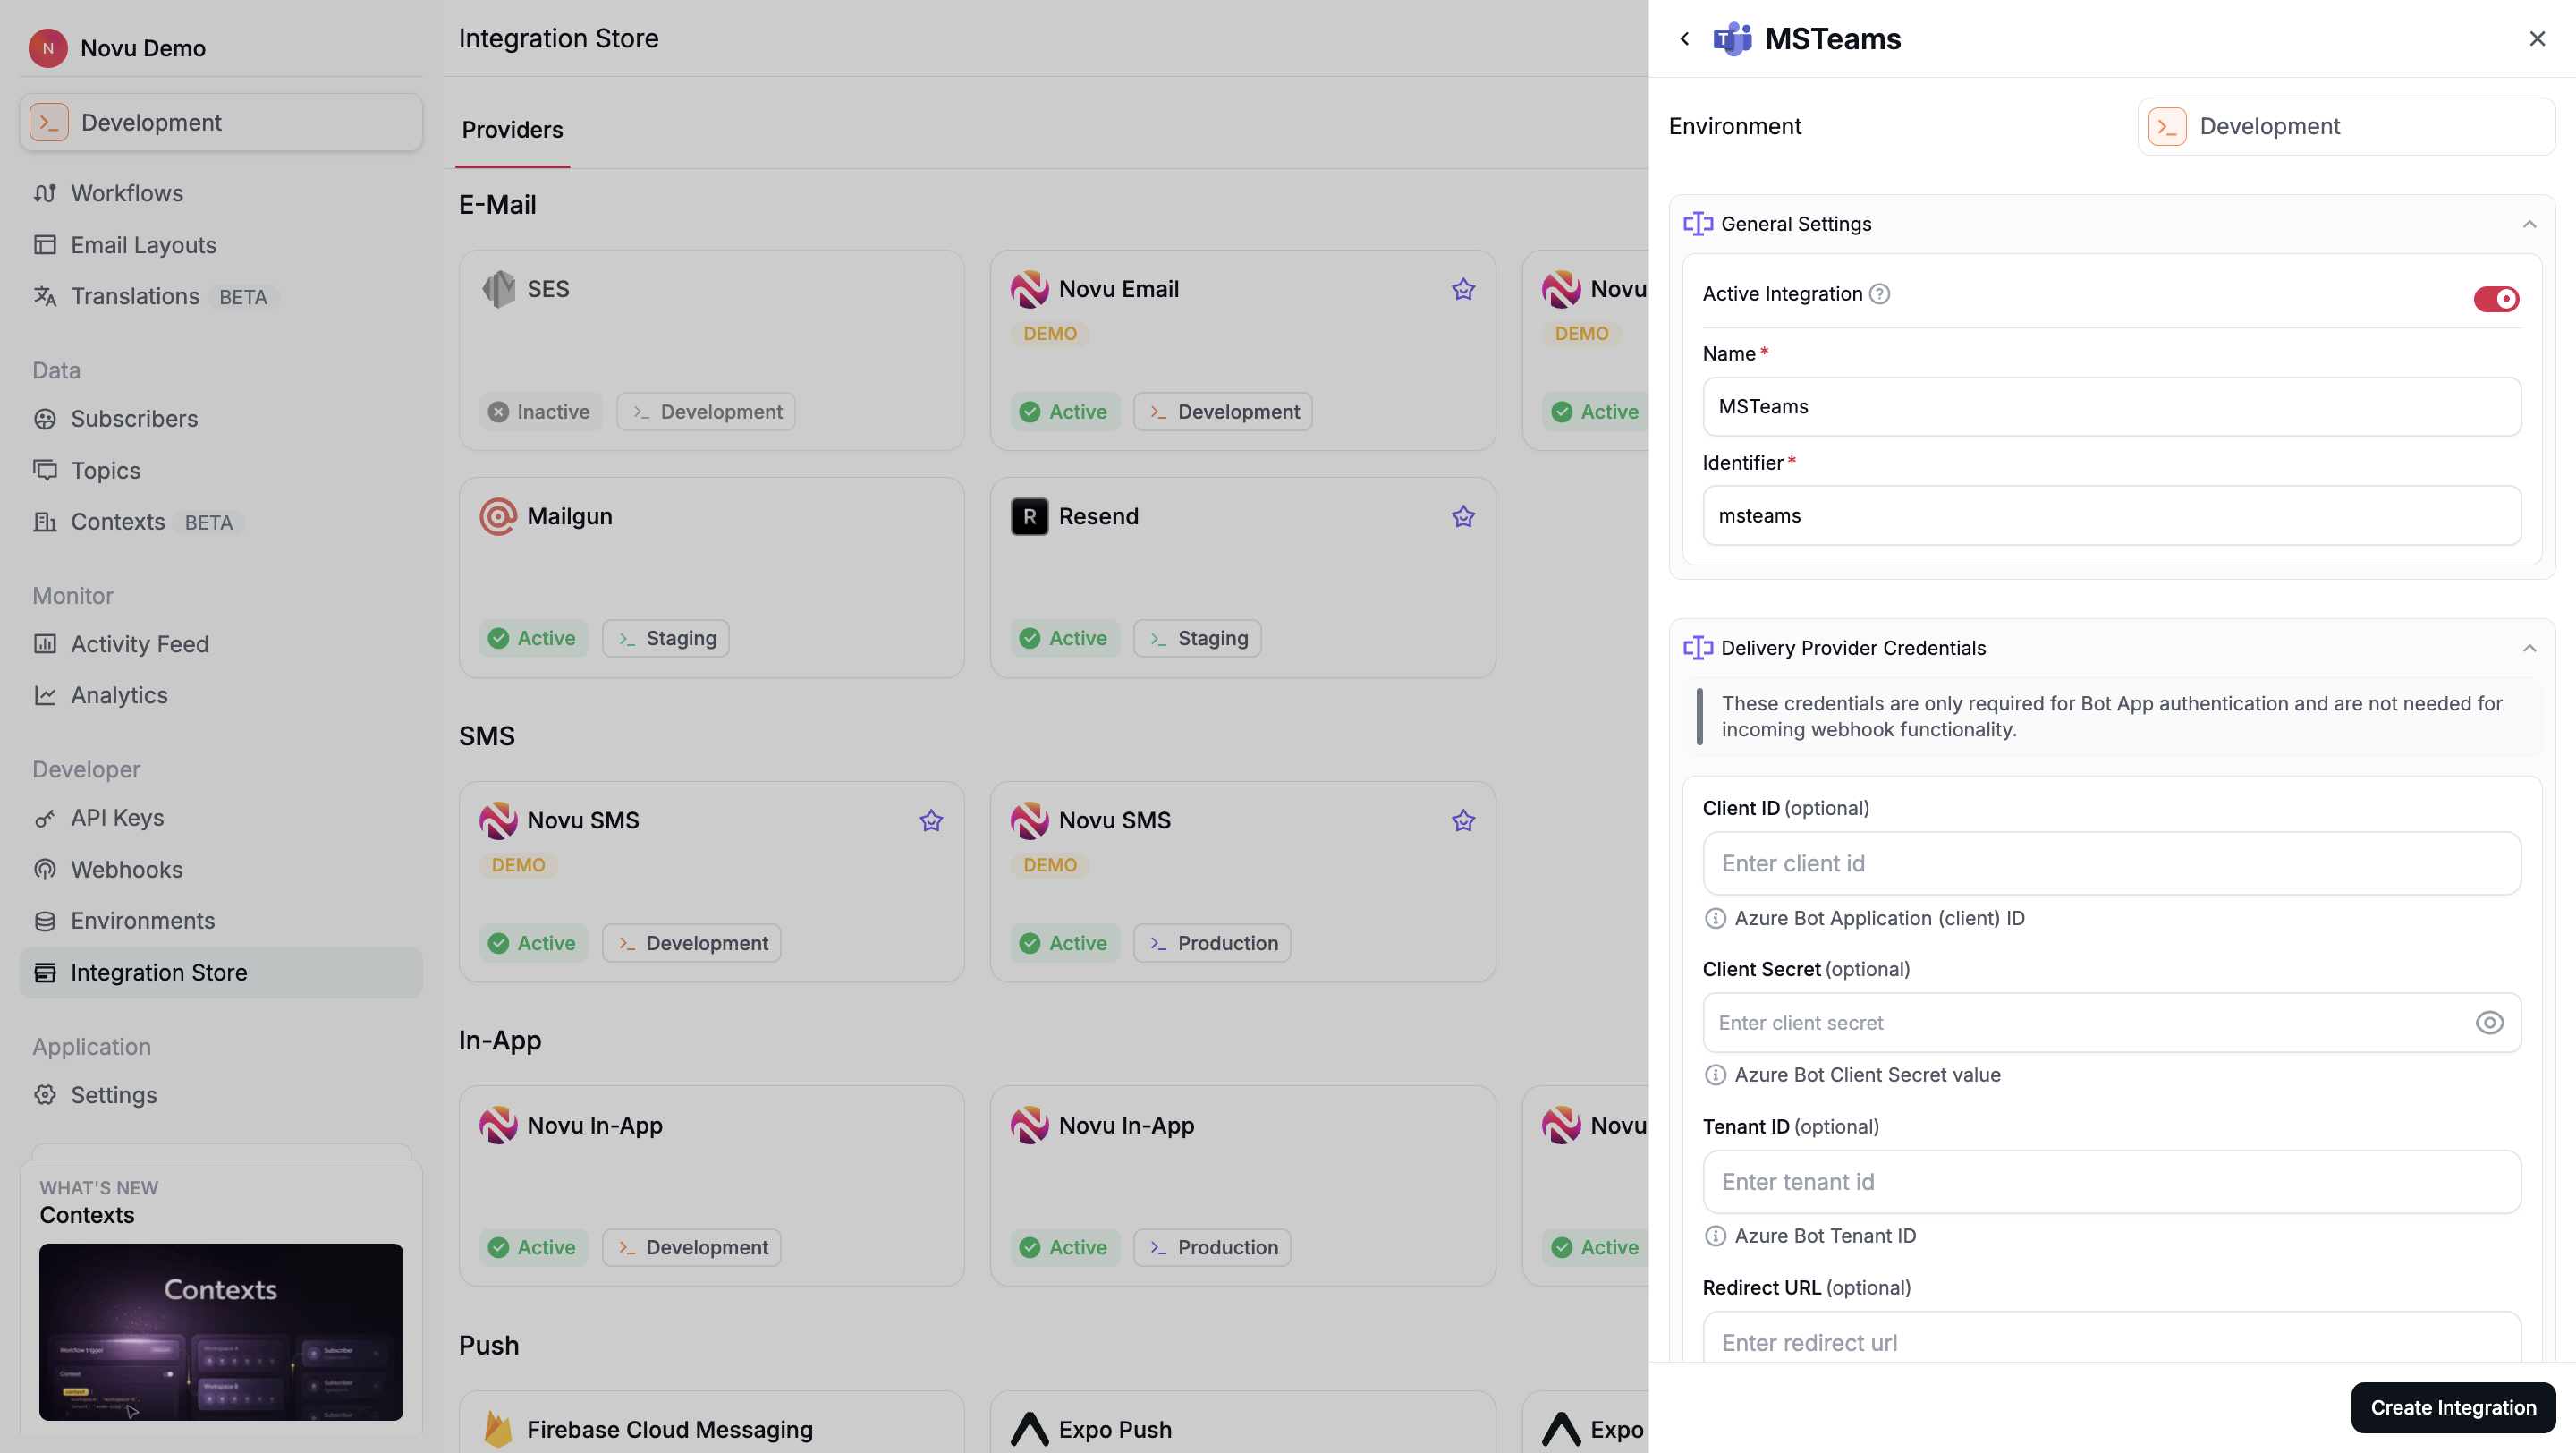
- Client ID: Enter your
- Click Create Integration
Novu is now authenticated to act as your Bot. However, it cannot send messages yet because no customers have installed the bot.
Let your customers connect their tenant
Each of your customers has their own Microsoft 365 tenant. Before you can send them messages, they must grant your app a one time admin consent. This authorizes your bot to act within their environment.
Generate a "Connect Teams" URL
On your backend, use the Novu SDK to generate the authorization URL. This URL is specific to the customer's tenant context in your system.
Novu returns a URL pointing to Microsoft's admin consent endpoint. This URL already includes your Client ID, Redirect URI, and the necessary Graph scopes.
Show it in your UI
In your frontend application, bind this URL to a button:
What the customer admin does
- A Teams/Microsoft 365 Admin from your customer's organization logs into your product.
- They clicks your Connect Microsoft Teams button.
- They see a Microsoft consent page listing the permissions.
- They clicks Accept.
When this is done, Microsoft redirects the user back to Novu. Novu captures the customer's tenant ID and automatically creates a Teams connection for that specific tenant context. You do not need to handle the callback yourself.
Customer installs your app in their Teams
Granting Admin consent in the previous step only authorizes your bot to exist in the customer's tenant. It does not automatically add the bot to any specific teams or chats.
For the bot to send messages, it must be installed in the specific context where notifications should appear:
- For channel messages: The app must be installed in the specific Team.
- For direct messages (DMs): The app must be installed for the specific User (Personal scope).
Your customer’s admin can install your app from the Teams app store or their org catalog, depending on how you published. However, if you requested the TeamsAppInstallation.ReadWriteSelfForTeam.All permission, your backend can programmatically install the app into a specific team using the Microsoft Graph API.
Tell Novu where to send the messages
Your customer decides where notifications should land and gives you the right IDs and then your backend registers them as Channel Endpoints in Novu.
There are two supported destination types:
- Channels: Sending a message to a specific channel within a Team.
- Users: Sending a direct message (DM) to a specific user.
Sending message to channels
To send a notification to a specific channel, you need to discover the Team ID and Channel ID from Microsoft, and then register them in Novu.
Find the Team and Channel IDs (Microsoft Graph)
You can discover these IDs using the Microsoft Graph API. This requires an App-Only Token (Client Credentials) scoped to the customer's tenant.
- Get a Graph access token:
The SUBSCRIBER_TENANT_ID is the ID of the customer's tenant, which Novu stored on the ChannelConnection object after they completed the Admin Consent flow.
- List teams:
- List channels in a team:
Register the channel endpoint (Novu)
Once you have the IDs, create an ms_teams_channel endpoint in Novu. This maps a subscriber to that specific channel.
Novu stores this as ChannelEndpoint<'ms_teams_channel'>. You can later target it from workflows via subscriberId + context.
Sending direct message to a user
To send a direct message (DM), you need the user's Teams User ID before registering the user endpoint in Novu.
Find the user ID (Bot framework)
You cannot use the Graph API for this. You must use the Bot Framework API to inspect the roster of a team the bot is installed in.
- Ensure the bot is installed in at least one team that includes the target user(s).
- Get a Bot Framework token:
- Call the roster API for that team, using the team’s
19:...@thread.tacv2id as{TEAM_CONVERSATION_ID}:
From the returned members, take the member’s id this is the Teams user ID (29:...) you’ll use as userId.
Register the user endpoint (Novu)
Once you have the IDs, create the endpoint in Novu using the ms_teams_user type.
Novu stores this as ChannelEndpoint<'ms_teams_user'>. From here, any workflow that resolves to this endpoint will send a DM from your bot to that user.
Workflows for Teams (Webhook-style)
If you do not need a full Bot identity or Direct Message capabilities, you can support a simplified, channel-only integration using Workflows for Microsoft Teams.
This approach relies on a unique Webhook URL generated by the Teams client. It requires no Azure app registration and no admin consent.
User generates the webhook URL (Teams client)
The setup begins inside the Microsoft Teams application. Instruct your users to follow these steps:
- In Microsoft Teams, go to Apps in the sidebar.
- Search for and open Workflows.
- Click Create new flow either from blank or template.
- Choose a trigger like “When a Teams webhook request is received”.
- Add an action to post a message into a specific channel.
- Save the workflow
- Once created, the workflow generates a unique URL. The user must copy this URL.
Register the webhook endpoint (Novu)
Unlike the Bot integration, you do not use ms_teams_channel here. Instead, you treat this as a generic webhook endpoint. Your application should provide a form where the user can paste the URL they generated in the previous step.
Sending the notification
When you trigger a workflow that targets this subscriber:
- Novu sends a standard HTTP POST payload to the Teams Workflow URL.
- Workflows for Teams receives the payload.
- The Workflow executes and posts the message content into the configured channel.